
Friday, March 29, 2013
Shiny
Last weekend I went to Dylon's house to play some Battlefield 3 on Xbox while the wife went to a concert to see Eric Church and Florida Georgia Line. We were unstoppable but we soon got tired of being so good(LOL just kidding) so he had the idea to paint his Xbox controller, he had seen where I painted a few of mine so he asked if I would help. Now Dylon has been my friend since we were in the crib at his moms house throwing baby powder everywhere so I never have a problem with helping him out. We ran to the store and started painting, he did his green with black thumb sticks. It turned out pretty good so I decided to paint mine battleship grey with a thick clear coat. Well for some reason the paint would not fully harden so every time we touched it the controller would stick to our hands. Dylon eventually got his to dry but mine on the other hand would not. After I got back to my place I pulled out my paint thinner and cleaned all the paint off the controller and decided to start over. This time I went with flat black with a clear coat that has metallic flake in it, and let me tell you it turned out awesome!

Wednesday, March 27, 2013
A few systems
Over the years I've gotten quite the collection of video game systems. In this post I figured I'd show some of the ones that I have.

Game Boy, Game Boy, Game Boy! In this picture from left to right there is: The classic Game Boy AKA "the brick". My first love as a child I remember countless hours playing Mario in my room. Now the classic Game Boy in the picture is not the original Game Boy I had as a kid. This Game Boy I got from a friend a long time ago. His grandfather worked in the airport and as you can see the black screen protector is gone so someone left it on top of the trash can. My friends grandfather saw it and gave it to him, in turn my buddy gave it to me and I've had it ever since. Its strange because it works so well there aren't even any scratches on the thing, its in mint condition minus the screen protector which I saw that they sell them on eBay so I may hop on over there and pick one up.
Next up is the clear Game Boy Pocket. When I was in elementary school this was the thing to have! sadly I did not have one, although at the time Yo-Yo's were very popular and I had one from Australia called the Black Mamba, everybody wanted it. Lucky for me someone wanted it bad enough to trade me their super awesome clear Game Boy Pocket!
There is also another Game Boy Pocket that one is silver I cant actually remember where I got that one from.
Then comes the biggest leap forward for man kind! Color! the Game Boy Color, paired up with a light that could plug into the top of it I remember countless nights staying up way past my bedtime underneath the covers playing Pokemon Yellow. I actually have two Game Boy Color. Both are the same color except one of them I have converted into solar power. A solar panel is on the back side of it with solar rechargeable batteries on the inside. I will do a post about that later though.
Next up is the Game Boy Advance. New buttons on the top of the case, New shape, Its color plus it takes new cartridges that can pack more gaming into them! It was awesome even though it is purple! With this hand held system came new Pokemon games that could do more, which is always a good thing. I've loved Pokemon since I was a kid and I still do. It wasn't about getting monsters and making them fight each other, it was about an adventure with a group of friends trying to better yourself to become the champion, and as a prize you would have all these new companions that helped you do it.
Now we are getting to the good part. LET THERE BE LIGHT! Yup that's right the Game Boy Advance SP. This little baby was smaller, lighter, still had the amazing new games but the key thing here is that it had a built in light and rechargeable battery! Never again will you have to be directly under a light to be able to play the game. Never again will you have to steal all the AA batteries out of the TV remotes and have your parents tracking you down to get them back. Now the Advance SP in the picture is the second one that ive owned, the first I lost while on vacation with my family. I had just beat the new Mario Brothers game too!
Last but not least is the handheld that changed the name of the game. Literally. Nintendo finally let the Game Boy series of handhelds take a vacation. This pink little beauty is the Nintendo DS Lite. AKA Nintendo Dual Screen. This bad boy can do it all. Two screens, touch screen, rechargeable battery you name it. It also has a new cartridge for the games. This system didn't stay pink for very long it now looks like this.


Don't get me wrong I like pink, but just think of the looks I would get. A 25 year old man playing a pink handheld in public, not going to happen. I switched out the case for a clear blue case as you can see. It was fairly simple, it was my first time taking apart a Nintendo DS but as long as you remember how you took it apart then putting it together is no problem.
Next up is the consoles.

The Nintendo Entertainment System AKA NES. Now as you can see this picture is not actually the NES but it is a really cool game cartridge, controller drawer I've had since I can remember. I don't have a picture of my NES right now as it is in pieces for a good deep cleaning. 28 years of dust and dirt can wreak havoc on a game console, but it does still work perfectly. Microsoft needs to take pointers from Nintendo, seeing as most of the first Xbox 360's got the red ring of death within the first few years, but yet 28 years later the NES is still kicking!

Next up is the Sony Playstation 2 AKA the PS2. Now this was a system! It had all the bells and whistles. CD/DVD disk reader so you could not only play games but you could watch movies on it too, it had memory card slots so you could have more then one game save along with the option to hook it up to the internet for online play. Now in this picture this is the PS2 that I bought at a yard sale a while back, the case was in pretty rough shape so I decided to modify it a bit. Painted it silver and put some LED's on the inside with a tribal design cut out on the top. My other PS2 is in mint condition but I don't have a picture of that at the moment.

I did end up changing the case on this one as it still looked pretty rough.

Next up, the Nintendo Gamecube. This was a fun little console, Nintendo's try at the rival battle between Microsoft and Sony. It didn't do as well as they hoped but I still love this little system. I did a slight modification to it, found some carbon fiber wrap at the store so I tested it out on the Gamecube, I think it turned out pretty good.

The Xbox 360. I already have a post about this bad boy but its part of my collection so I had to post it.
Now I think its time to end this incredibly long post. I still have a few consoles to post up but I don't have pictures at the moment so that will have to wait till part 2.
Something a little different
My grandparents believe I'm a jack of all trades, and it may be that way. A while back my grandfather hit a pole in a parking lot with his vehicle, he asked me if I could fix it one day while at his house. I'm actually pretty good with bodywork on cars, not sure why I've never had training on it and never taken any classes it just comes natural to me, which I dont mind at all because I love working on cars.
The picture below you can clearly see where the bumper cover is messed up and lucky for me these new cars use ABS plastic for their bumper covers, a little heat and a rubber hammer and you can get any dent like this out of a ABS bumper cover. Once the dent is popped out the paint will still be messed up so time to prep everything for paint.

To prep the bumper I mixed some Dawn dish soap into a bucket with warm water to wash it down and get all oils and grime off of it, then I taped everything off that I didn't want over spray to get on. After it was all taped up it was time to put down a coat of primer, then it sat for a while so it could dry. After the primer was all done drying it was time for paint I sprayed a light top coat of GM paint match spray paint, usually I would get the actual car paint and use it in my touch up spray gun but I didn't have any of that with me at my grandfathers house. Once that coat was done I put another heavier coat of paint on it and when it dried I wet sanded 1000 grit sand paper all the way to 2500 grit sand paper to make sure it had a nice finish. Well this is the finished product, I think it turned out really nice.

A bunch of randoms
Hello again! Today's post will be a bunch of random projects I have started and some that I have completed. I will explain a little about each one.

This first project is a piece of slate that my father found while hunting. He said he believes it was a type of shingle for older houses as there were a bunch of them laying around in the same spot. As you can tell I'm not the greatest with a paintbrush lol. I think it turned out decent though. Once it warms up I'm going to drill two holes in the top and run a small chain from each one and hang it from the bottom of our mailbox.


These next two were just a random idea I had. One day I noticed how bland the light switch covers looked so I wanted to change that. I had a bunch of old neck ties laying around so I started cutting. Its a pretty simple job, just cut the tie to size and glue it on. The bottom picture it turned out great but the top one I had run out of spray glue so its not the best looking.


This is a neat little lamp that I made. When my wife and I got married we used wine bottles and put flowers in them to sit on the tables at the reception. There were tons left over so I grabbed one that looked pretty cool, and grabbed a old broken lamp. I took apart the lamp to get the cord and socket out so I could feed it through the bottle, the only problem was that there is no hole in the bottom of the bottle. In comes the power tools! I grabbed my drill and a glass drill bit and went to town. eventually I got a hole but it was no where big enough for the end of the cord to go through. I had to cut the cord in two and then put it back together. CAUTION!!! do not cut cords and then wrap them back together with electrical tape, use heat shrink or some other type of wire wrap. It needs a new lamp shade but that one works for now.


This is a project I've started but yet to finish. Its a outdoor table I've been making out of pallets. So far I've made two legs and the table top but there is still a ton of work and a ton of sanding to be done. Its turning out pretty nice though!


More pallet projects! This time I made a chair, the top two pictures were taken before I put stain on it. It turned out pretty nice and I have to say its pretty darn comfortable! One day my father came over and saw it, I told him to sit in it because he kept saying that it would be stiff and not very comfortable, boy was he wrong he liked it so much he wants me to make him a few.

This last one is something I made for my wife. Its a key chain with five pennies on it, each penny has a special date on it. The first one is 1988 the year her and I were born, the second is 2007 the year her daughter was born, the third is 2010 the year we started dating, the fourth is 2011 the year we got engaged and the fifth is 2012 the year we got married.
thats all for now, check back later for more posts!
A simple set of chairs
Hello again. A while back my grandfather gave me a set of chairs that were left in the garage of his rental property. They were in pretty rough shape and he was going to throw them out, he asked me if I wanted them so I went to take a look and see what I was working with. They were dusty, covered in cobwebs and had a bit of mold on them. I put them in my truck and brought them on home. After cleaning them up they didn't look as bad as they did but they needed a overhaul for sure. At first I was going to strip them all and stain them again but after seeing how hard it was to get the original stain off I decided to sand down the seat and the back piece.


At this point in the picture I had already started sanding. The back part of the seat that is already sanded down was really easy to clean up, but the seat bottom was not as easy! I popped out my orbital sander and went to town.


Now that I have the seat bottom and back sanded down I needed to figure out what to do with the legs and poles on the back. I tried sanding but that stuff just wouldn't come off, So I looked around the man cave and found two types of paint. Flat black and gloss black, so I tried both of them.

At first I thought that the flat black would look better, but after the paint was on the gloss was by far the better choice. I taped everything up and went to town. I dont have a picture of that step, but I do have 3 more chairs to do so when the time comes that I decide to work on them I will snap some pictures.


All painted and looking good! I love the way it turned out. After I finish the other three I'm going to see if the wife will let me swap them out for the chairs at our dinner table.
The final product after I put some clear coat on the black.

As of right now its all done, but I'm still trying to decide if I want to put clear coat on the bare wood or not, I like the natural look.
As a side note I have been looking around on Betterafter.net and I have seen where people paint from the bottom of the legs to about the middle of the leg. I think I may get some gold paint and try it out and then maybe paint some gold rings on the poles on the back of the chair to see what it looks like. I will update this thread with new pictures if I do it.
Tuesday, March 26, 2013
Custom Xbox 360
The time came that I never wanted to see. My beloved Xbox 360 got the dreaded red ring of death! That was about two years ago today, I held onto it just in case I could figure out how to fix it, and indeed I did figure out how to fix it! Its actually quite simple now that I think about it. A little bit of thermal paste some rubbing alcohol and a few screws and nylon washers and bam! a fixed Xbox 360! well thats most of what you need, but anyway back to the story. I fixed the 360 about 6 months ago so now I thought would be a good time to give that bland white case a makeover! The most recent picture I have is after I had already cut the window into the side but I'm sure you know what a generic white Xbox 360 looks like


Cutting the window out was actually pretty easy. Took a pencil and made a square then used my dremel and cut it out, after that I used some small files and went all around the cuts to even them out and make straight lines. Then I had some plexiglass that I cut to size and hot glued on the back side of the case so no dust or hands could get on the inside.
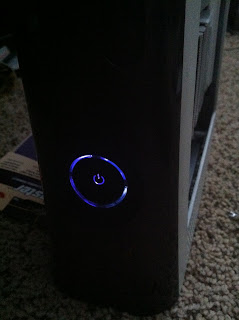
After I did all that the next step was paint sadly I don't have pictures of this step either as at the time I wasn't planning on making a blog lol, but anyways I primed, painted and clear coated the whole case. Now the fun part begins! working on the inside. Now that I had this nice looking window and newly painted case I had to do something to make it all pop! Thats where my LED strips come in. I ran them along the inside of the case and soldered them to the 12v spot on the motherboard, then while I had the case apart I went ahead and added some purple SMD's to the ring of lights on the front and it all turned out like this.


BTW some of the pictures you will notice the wire coming through the window, that was before I had put the window in its no longer like that :).
The LED's I added are color chaning there is a remote with color options you can cycle through all the colors fast or make it slow, or you can choose just one color to leave it on.
Also I added a window to the hard drive for the 360 and added some purple LED's in that.


Well that's all the updates for today. I will upload more tomorrow.
Subscribe to:
Posts (Atom)